-
[패스트캠퍼스] Java & Spring 웹 개발 종합반 7주차 학습일지패스트캠퍼스/Java & Spring 웹 개발 종합반 2023. 3. 26. 21:05

내일배움카드, 국비지원교육
Chapter 02. Spring MVC
23. 쿠키(Cookie)
쿠키 : 이름과 값의 쌍으로 구성된 작은 정보 (아스키 문자만 가능)
서버에서 생성 후 전송, 브라우저에 저장
유효기간 이후 자동 삭제
서버에 요청 시 domain, path가 일치하는 경우에만 자동 전송
// 쿠키 생성
Cookie cookie = new Cookie(name, value);
cookie.setMaxAge(60*60*24); // 24H
response.addCookie(cookie);

// 쿠키 삭제
Cookie cookie = new Cookie(name, value); // 변경할 쿠키와 같은 이름 쿠키 생성
cookie.setMaxAge(0);
response.addCookie(cookie);

// 쿠키 변경
cookie.setValue(URLEncoder.encode("값")) // 값 변경
cookie.setDomain("도메인") // 도메인 변경
cookie.setPath("경로") // 경로 변경

// 쿠키 읽어오기
Cookie[] cookies = request.getCookies();
24 ~ 26. 세션(Session)
세션 : 서로 관련된 요청들을 하나로 묶은 것
- 브라우저마다 개별 저장소를 서버에서 제공
- 쿠키를 이용해 세션ID를 주기 때문에, 독립적인 요청들을 세션ID로 분류해 응답 가능
- 수동 종료 : invalidate(), 자동 종료 : timeout
HttpSession session = request.getSession();

// 수동 종료
session.invalidate();			// 세션 즉시 종료
session.setMaxInactiveInterval(30*60)	// 예약 종료 (30분)

// 자동 종료 web.xml
<session-config>
	<session-timeout>30</session-timeout>
</session-config>
메서드 설명 String getId() 세션의 ID를 반환 long getLastAccessedTime() 세션 내에서 최근 요청을 받은 시간을 반환 boolean isNew() 새로 생성된 세션인지 반환 void invalidate() 세션 객체를 제거 void setMaxInactiveInterval(int interval) 지정된 시간 후에 세션을 종료 int getMaxInactiveInterval() 예약된 세션 종료 시간을 반환 

원래 referrer이 맞다고 하시길래 그렇게 썼는데 자꾸 null이 나와서.. 강사님과 똑같이 수정했더니 잘 나온다
찾아보니까 referer가 맞는데요..!!
27 ~ 28. 예외처리
@ExceptionHandler(Exception.class)
public String catcher(Exception ex, Model m) {
	m.addAttribute("ex", ex);
	return "error";
}
// 예외 처리를 위한 메서드
// catch 블럭이라고 생각하면 됨
@ControllerAdvice // 클래스에 위 어노테이션을 붙이면 // 모든 컨트롤러에서 발생하는 에러를 잡아줄 수 있음 @ControllerAdvice("com.pastcampus.ch2") // 위처럼 패키지 지정도 가능@ResponseStatus(HttpStatus.METHOD_NOT_ALLOWED) // 응답 메시지의 상태 코드를 변경할 때 사용 // 사용자 정의 예외 클래스 만들 때 사용error jsp에서 isErrorPage="true" 이용해서 예외 객체 사용 가능
단, 상태코드는 500으로 바뀜
// web.xml에 상태코드별로 뷰 지정 가능
<error-page>
	<error-code>400</error-code>
	<location>/error400.jsp</location>
</error-page>

<error-page>
	<error-code>500</error-code>
	<location>/error500.jsp</location>
</error-page>

// servelet-context.xml에 예외종류별로 뷰 매핑
<beans: bean class="org.springframework.web.servlet.handler.SimpleMappingExceptionResolver">
	<beans:property name="defaultErrorView" value="error"/>
    <beans:property name="exceptionMappings">
    	<beans:props>
        	<beans:prop key="com.fastcampus.ch2.MyException">error400</beans:prop>
        </beans:props>
    </beans:property>
    <beans:property name="statusCodes">
    	<beans:props>
        	<beans:prop key="error400">404</beans:prop>
        </beans:props>
    </beans:property>
</beans:bean>
handlerExceptionResolver
- ExceptionHandlerExceptionResolver
- ResponseStatusExceptionResolver
- DefaultHandlerExceptionResolver
29. DispatcherServlet 파헤치기 (한번 더 보기)
HandlerMapping : URL과 매칭되는 메서드를 가져옴
HandlerAdapter : DispatcherServlet과 Controller를 느슨하게 연결해 변경에 유리함
ViewResolver : 접두사와 접미사를 붙여서 실제 뷰 이름을 알려줌

30 ~ 31. 데이터의 변환과 검증
WebDataBinder : GET 요청으로 받은 데이터로 타입 변환과 데이터 검증을 하고 결과를 BindingResult에 저장
BindingResult는 Binding 할 객체 바로 뒤에 작성해야 함
@InitBinder
public void toDate(WebDataBinder binder) {
	SimpleDateFormat df = new SimpleDateFormat("yyyy-MM-dd");
	binder.registerCustomEditor(Date.class, new CustomDateEditor(df, false));
}
// 컨트롤러 내에서만 적용

@DateTimeFormat(pattern="yyyy-MM-dd")
// 해당 객체에만 적용
PropertyEditor : 양방향 타입 변환, 사용자가 직접 구현도 가능 (stateful)
Converter : 단방향 타입 변환 (stateless)
public class StringToStringArrayConverter implements Converter<String, String[]> {
	@Override
    public String[] convert(String source) {
    	return source.split("#");
    }
}
// ConversionService에 등록해야 함
Formatter : 양방향 타입 변환
@DateTimeFormat(pattern="yyyy/MM/dd")
Date birth;

@NumberFormat(pattern"###,###")
BigDecimal salary;
Validator : 객체를 검증하기 위한 인터페이스
글로벌 Validator : 하나의 Validator로 여러 객체를 검증할 때, 글로벌 Validator로 등록
// servlet-context.xml
<annotation-driven validator="globalValidator"/>
<beans:bean id="globalValidator" class="com.fastcampus.ch2.GlobalValidator"/>
글로벌 Validator와 로컬 Validator를 동시에 적용하려면?
@InitBinder
public void toDate(WebDataBinder binder) {
	SimpleDateFormat df = new SimpleDateFormat("yyyy/MM/dd");
    	binder.registerCunstomEditor(Date.class, new CustomDateEditor(df, false));
    	binder.addValidators(new UserValidator());
}
MessageSource : 다양한 리소스에서 메시지를 읽기 위한 인터페이스
//servlet-context.xml에 등록
<beans:bean id="messageSource" class="org.springframework.context.support.ResourceBundleMessageSource">
	<beans:property name="basenames">
    		<beans:list>
        		<beans:value>error_message</beans:value>
        	</beans:list>
   	</beans:property>
	<beans:property name="defaultEncoding" value="UTF-8"/>
</beans:bean>

//error_message.properties 파일 생성
// ex : require=필수 항목입니다.

// 스프링이 제공하는 커스텀 태그 라이브러리 사용
<%@ taglib uri="http://www.springframework.org/tags/form" prefix="form" %>

// <form> 대신 <form:form> 사용
<form:form modelAttribute="user">
<form id="user" action="/ch2/register/add" method="post">

// <form:errors>로 에러 출력
<form:errors path="id" cssClass="msg"/>
<span id="id.errors" class="msg">필수 입력 항목입니다.</span>
<추가 강의>
Chapter 02. Spring MVC
34. 프로젝트 export와 import
Add configuration에서 Tomcat Server 추가하기
Chapter 03. Spring DI와 AOP
01 ~ 03. Spring DI 흉내내기
변경에 유리한 코드 - 다형성, Map과 외부 파일 (diCopy1)
객체 컨테이너(저장소) ApplicationContext 만들기 (diCopy2)
자동으로 객체 등록하기 (guava library 이용) & 이름과 타입으로 객체 찾기 (diCopy3)
객체를 자동 연결하기 (diCopy4)
- @Autowired (인스턴스 변수 앞에 붙이면 자동으로 연결해줌)
xml 파일 : <context:annotation-config/>
- @Resource
04 ~ 08. Spring DI 활용하기
여러 객체를 만들려면 xml 파일의 bean에 scope="prototype" 을 작성하면 됨 (기본 값은 singleton)
setter가 있어야 xml 파일에서 property 설정 가능
매개변수가 있는 생성자가 있어야 xml 파일에서 constructor-arg 설정 가능
1. 빈(bean)이란?
- JavaBeans : 재사용 가능한 컴포넌트
- Bean : Spring Container가 관리하는 객체
- Spring Container : Bean 저장소, Bean을 저장 & 관리(생성, 소멸, 연결)
1. BeanFactory : Bean을 생성, 연결 등의 기본 기능 정의
2. ApplicationContext : BeanFactory를 확장해서 여러 기능을 추가 정의
System.out.println("ac.getBeanDefinitionNames() = " + Arrays.toString(ac.getBeanDefinitionNames())); // 정의된 빈의 이름을 배열로 반환
System.out.println("ac.getBeanDefinitionCount() = " + ac.getBeanDefinitionCount()); // 정의된 빈의 개수를 반환

System.out.println("ac.containsBeanDefinition(\"car\") = " + ac.containsBeanDefinition("car"));  // true 빈의 정의가 포함되어 있는지 확인
System.out.println("ac.containsBean(\"car\") = " + ac.containsBean("car")); // true 빈이 포함되어 있는지 확인

System.out.println("ac.getType(\"car\") = " + ac.getType("car")); // 빈의 이름으로 타입을 알아낼 수 있음.
System.out.println("ac.isSingleton(\"car\") = " + ac.isSingleton("car")); // true 빈이 싱글톤인지 확인
System.out.println("ac.isPrototype(\"car\") = " + ac.isPrototype("car")); // false 빈이 프로토타입인지 확인
System.out.println("ac.isPrototype(\"door\") = " + ac.isPrototype("door")); // true
System.out.println("ac.isTypeMatch(\"car\", Car.class) = " + ac.isTypeMatch("car", Car.class)); // "car"라는 이름의 빈의 타입이 Car인지 확인
System.out.println("ac.findAnnotationOnBean(\"car\", Component.class) = " + ac.findAnnotationOnBean("car", Component.class)); // 빈 car에 @Component가 붙어있으면 반환
System.out.println("ac.getBeanNamesForAnnotation(Component.class) = " + Arrays.toString(ac.getBeanNamesForAnnotation(Component.class))); // @Component가 붙은 빈의 이름을 배열로 반환
System.out.println("ac.getBeanNamesForType(Engine.class) = " + Arrays.toString(ac.getBeanNamesForType(Engine.class))); // Engine 또는 그 자손 타입인 빈의 이름을 배열로 반환
2. IoC와 DI
- IoC(Inversion of Control) : 제어의 흐름을 전통적인 방식과 다르게 뒤바꾸는 것
- DI(Dependency Injection) : 사용할 객체를 외부에서 주입받는 것
- @Autowired (byType)
-> Spring container에서 타입으로 빈을 검색해서 참조 변수에 자동 주입(DI)
-> 검색된 빈이 n개이면, 그 중에 참조변수와 이름이 일치하는 것을 주입
- @Resource (byName)
-> Spring container에서 이름으로 빈을 검색해서 참조 변수에 자동 주입(DI)
- @Component
-> <component-scan>으로 @Component가 클래스를 자동 검색해서 빈으로 등록
13. Spring으로 DB연결하기
maven repository에서 springJDBC, Spring TestContext Framework 추가
JUnit Test Framework - test 자동화
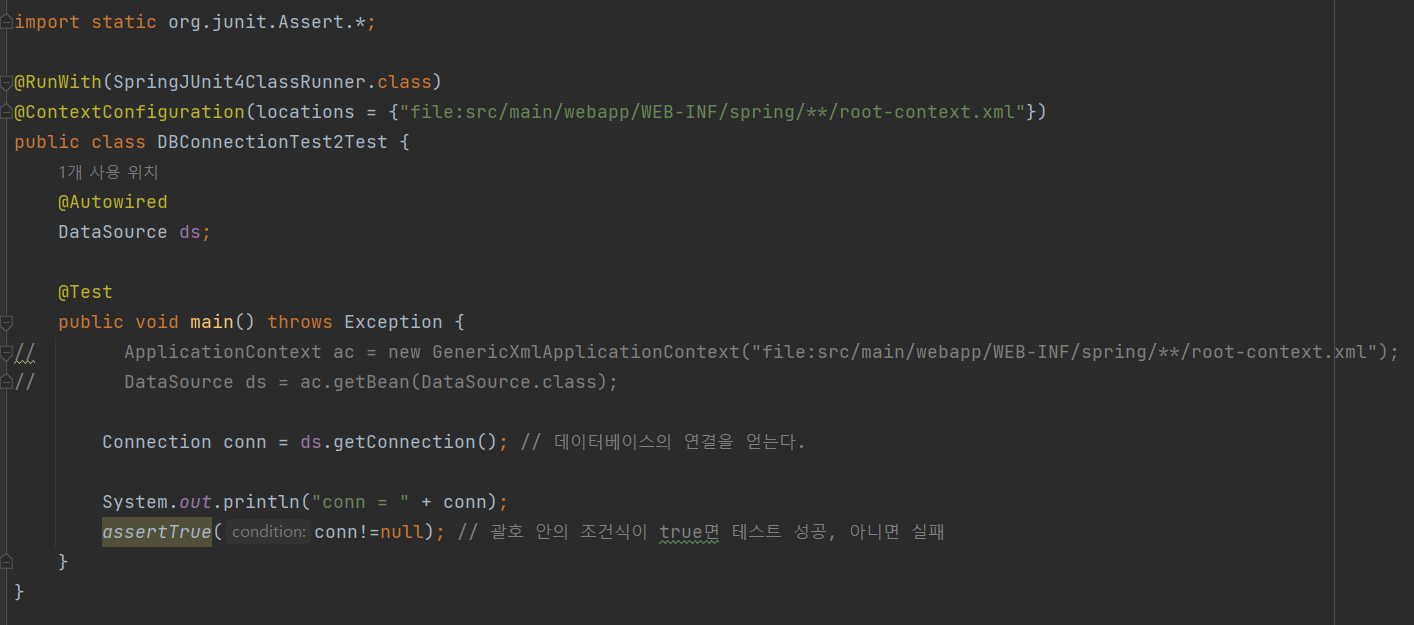
14. Spring으로 DB 다루기 - TDD
insertUserTest() 오류
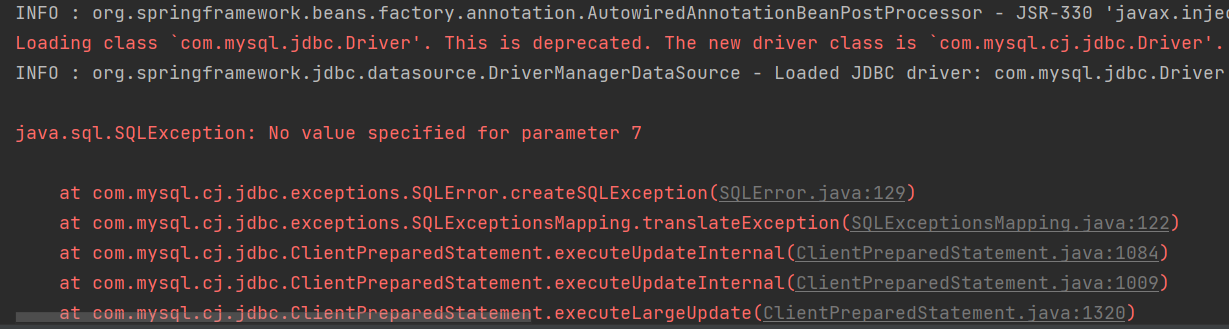
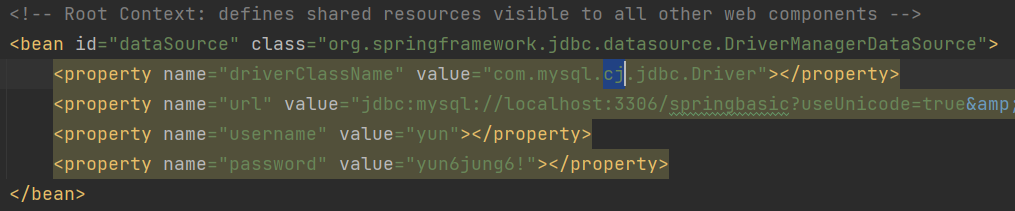
root-context 파일에서 cj를 추가해주니 해결
insertUserTest() 오류

-> import에 java.sql.Date를 지우고 java.util.Date로 수정
-> sql문에 now()를 빼먹음 ㅎㅎ; 해결 완~
update()랑 updateTest() 작성해보기!
'패스트캠퍼스 > Java & Spring 웹 개발 종합반' 카테고리의 다른 글
[패스트캠퍼스] Java & Spring 웹 개발 종합반 8주차 학습일지 (0) 2023.04.02 [패스트캠퍼스] Java & Spring 웹 개발 종합반 6주차 학습일지 (0) 2023.03.19 [패스트캠퍼스] Java & Spring 웹 개발 종합반 5주차 학습일지 (0) 2023.03.10 [패스트캠퍼스] Java & Spring 웹 개발 종합반 4주차 학습일지 (1) 2023.03.05 [패스트캠퍼스] Java & Spring 웹 개발 종합반 3주차 학습일지 (1) 2023.02.26